This is a small tutorial to render particles in maya using 3Delight. I've prepared a scene where a sphere emits from its surface some colored particles (you need to add your own texture here, any hdr image will work). The particle motion is driven by a fluid to make it a bit more interesting :)
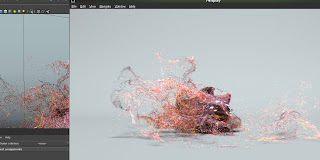
Above you can see the playblast of those particles moving. That is the base scene and you can download it from here. And the hdr i'm using is grace cathedral (http://ict.debevec.org/~debevec/Probes/).
Play the scene until about frame 35/40.
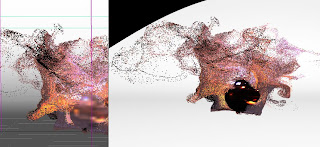
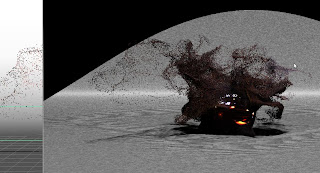
If you add a render pass on that scene (and select the camera from the dropdown menu on that renderpass) and try to render, you'll see something like this (right of the image):
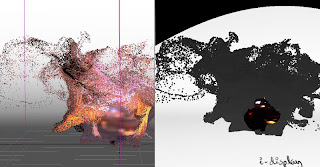
It doesn't look like the viewport particles yet. But we'll get there. First, select your particles and open the 3Delight Assignment Panel (3Delight > Assignment Panel). With particles selected, click on the Attribs checker icon to Assign a new attribs node.
Right click on "Add/Remove Attributes" and select Geometry > Particles > All

Set "Particle Size Override" to a small value (or try a render and see why).
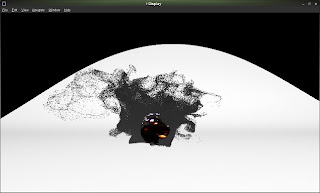
Probably will look like the image above with bigger particles. We already have the color per particle in the scene, exported as a primvar. We just have to use it. We will use rendermancode nodes.
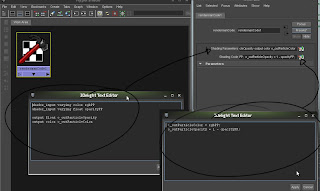
Open up your hypershade and from "Create" select General Utilities > Renderman Code
Click on the icon to the right of Shading Parameters and paste this:
Let's create a surface shader and connect the output of this renderman code node there.
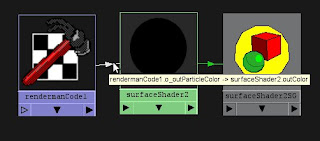
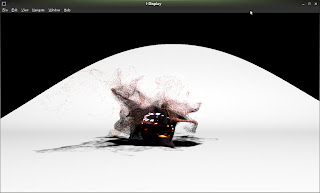
You can render that right now and get something more like this:
On the previous render we are getting color but nothing more... we'll add diffuse shading to the existing surface shader for the particles. Open your hypershade again and create another renderman code node and rename to rendermanCode_diffuse.
In the shading parameters, add:
I'm using the diffuse call on the shading code and multiply that by the float "diffuse". Now, to use that node, we'll modify the rendermanCode_color where we fetch the color of the particles. For the shading parameters we use:
Now we have diffuse and color for the particles, let's go with shadows.
But first, we will need a custom shader (for the spotlight). Download the file below and compile it (shaderdl ep_spotlight.sl on the command line/terminal)
Move the resulting sdl file to the 3delight's shader folder (in your 3delight installation directory > shaders). There's a bunch of other sdl files there.
Now, back in maya, select your spotLight in the outliner an copy paste the mel contained in this file. It will attach a renderman shader to that light, creating a connection between color, intensity, cone angle, etc., so you don't have to manually change those in the sdl file (and that sdl file will be the one compiled earlier). After you copy, paste and execute that mel in scrip editor, you can open the 3Delight assignment panel and you'll see there's a light there.
This is the light shader
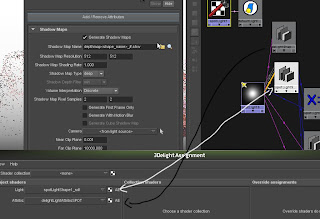
Now, you can render again and see something similar there. Let's add shadows. Select again your spotLight in outliner, open the 3Delight assignment panel and click the checker icon to the right of Attribs (this will assign a new and empty attribs node). Then, open attribute editor and from the Add/Remove Attributes, click Shadow maps > All
Enable generate shadow maps, set the "Generate Shadow Maps" checkbox, set the shadow map type from normal to deep and increase the shadow map pixel samples a bit.
now, the name of those shadow maps will be very long, usually with the name of the shape and the groups if there's a group in there. So the best way to set that shadow is to select your spotlight again and run the next mel (download, open, copy and paste the mel in script editor)
After executing it, you'll see something llike this as an "answer":
That's the name of the shadow map that will be created in the correct path of the shadow that out light shader has to use... capicci?
And this is how the spotlight looks in hypershade
Now, let's try another render
There are artifacts on the ground. Let's disable "cast shadows" on that object since those are self shadowing artifacts that we don't need anyway.

Let's add an opacity Per particle on the particle1 shape to fade those particles as they approach to the very end of their life. Select particle1, open particleShape1 tab and scroll down to Add Dynamic Attributes > Opacity > Add Per Particle Attribute.
Now, on that Opacity PP textbox right click > Create Ramp. Edit as you like, making its interolation linear, exponential up, exponential down, etc. The idea is to make it transparent before they die.
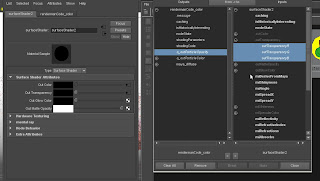
If you render again, you won't notice anything, right? Well, we have not connected that opacity to the surface shader yet! We have to connect those. Open hypershade and display input/output connections of surfaceShader2 (the one attached to the particles). To display nodes attached to the rendermanCode_color node, you have to select it as well and click on "Input and Output connections" on the hypershade as well...
Save your scene. There's a bug where maya can crash if you click on the arrows to navigate between renderman code nodes connections.
Soo, open hypershade and middle click and drag rendermanCode_color to surfaceShader2. Select "Other" from the menu to open the Connection Editor.
connect o_outParticleOpacity to outTransparencyR , outTransparencyG and outTransparencyB
close connection editor. And render.. you'll see opacity in action now.
Adjust opacity to taste.
If you noticed, there's something about the color. The sphere looks way too dark. That's because we are using a linear image. The particles look ok tho. Don't know why but should look as dark as the sphere. We can add a function to linearize the particles color (if you want, of course):
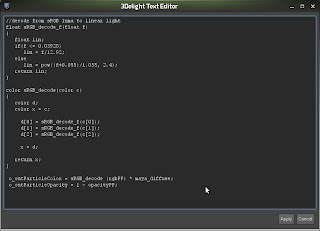
I hate I can't post code properly.. well, the above code will "linearize" the color from rgbPP. There's a lot of info @3delight forums about it..
Adjust the color on the ground object to a slightly darker blue, adjust diffuse values and cache the particles. Then, enable motion blur and render :)
You can download the final scene from here, but you have to do the light shader mel part since I'm on linux and I'm using different paths. Ain't difficult tho. Or simply attach any existing spot light shader and edit it manually.
And finally, the rendered sequence is this one:
good night and good luck.
Above you can see the playblast of those particles moving. That is the base scene and you can download it from here. And the hdr i'm using is grace cathedral (http://ict.debevec.org/~debevec/Probes/).
Play the scene until about frame 35/40.
If you add a render pass on that scene (and select the camera from the dropdown menu on that renderpass) and try to render, you'll see something like this (right of the image):

It doesn't look like the viewport particles yet. But we'll get there. First, select your particles and open the 3Delight Assignment Panel (3Delight > Assignment Panel). With particles selected, click on the Attribs checker icon to Assign a new attribs node.
Right click on "Add/Remove Attributes" and select Geometry > Particles > All

Set "Particle Size Override" to a small value (or try a render and see why).

Probably will look like the image above with bigger particles. We already have the color per particle in the scene, exported as a primvar. We just have to use it. We will use rendermancode nodes.
Open up your hypershade and from "Create" select General Utilities > Renderman Code
Click on the icon to the right of Shading Parameters and paste this:
Now, on the Shading Code paste this:shader_input varying color rgbPP
shader_input varying float opacityPP
output float o_outParticleOpacity
output color o_outParticleColor
The shader_input part in shading parameters is to fetch the primvar exported by 3delight for maya plugin, in this case named rgbPP and opacityPP. And we are just passing that as an output in the shading code (think of Ci). Rename this node to rendermanCode_coloro_outParticleColor = rgbPP;
o_outParticleOpacity = 1 - opacityPP;

Let's create a surface shader and connect the output of this renderman code node there.

You can render that right now and get something more like this:

On the previous render we are getting color but nothing more... we'll add diffuse shading to the existing surface shader for the particles. Open your hypershade again and create another renderman code node and rename to rendermanCode_diffuse.
In the shading parameters, add:
And in shading code just:float diffuse
varying output color o_diffuse
extern normal N;
o_diffuse = diffuse (normalize (N)) * diffuse;
I'm using the diffuse call on the shading code and multiply that by the float "diffuse". Now, to use that node, we'll modify the rendermanCode_color where we fetch the color of the particles. For the shading parameters we use:
Now, on the Shading Code paste this:shader_input varying color rgbPP
shader_input varying float opacityPP
color maya_diffuse
output float o_outParticleOpacity
output color o_outParticleColor
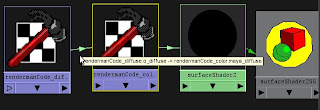
And yes, let's connect rendermanCode_diffuse node to rendermanCode_color's diffuse input:o_outParticleColor = rgbPP * maya_diffuse;
o_outParticleOpacity = 1 - opacityPP;

Now we have diffuse and color for the particles, let's go with shadows.
But first, we will need a custom shader (for the spotlight). Download the file below and compile it (shaderdl ep_spotlight.sl on the command line/terminal)
Move the resulting sdl file to the 3delight's shader folder (in your 3delight installation directory > shaders). There's a bunch of other sdl files there.
Now, back in maya, select your spotLight in the outliner an copy paste the mel contained in this file. It will attach a renderman shader to that light, creating a connection between color, intensity, cone angle, etc., so you don't have to manually change those in the sdl file (and that sdl file will be the one compiled earlier). After you copy, paste and execute that mel in scrip editor, you can open the 3Delight assignment panel and you'll see there's a light there.
This is the light shader

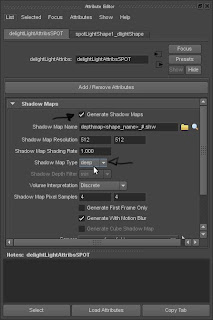
Now, you can render again and see something similar there. Let's add shadows. Select again your spotLight in outliner, open the 3Delight assignment panel and click the checker icon to the right of Attribs (this will assign a new and empty attribs node). Then, open attribute editor and from the Add/Remove Attributes, click Shadow maps > All

Enable generate shadow maps, set the "Generate Shadow Maps" checkbox, set the shadow map type from normal to deep and increase the shadow map pixel samples a bit.
now, the name of those shadow maps will be very long, usually with the name of the shape and the groups if there's a group in there. So the best way to set that shadow is to select your spotlight again and run the next mel (download, open, copy and paste the mel in script editor)
After executing it, you'll see something llike this as an "answer":
done <project>/3delight/<scene>/shadowMaps/depthmap_spotLight1_spotLightShape1_#.shw
That's the name of the shadow map that will be created in the correct path of the shadow that out light shader has to use... capicci?
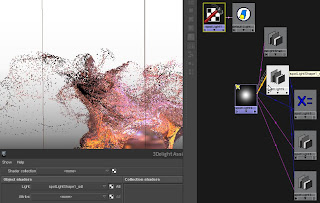
And this is how the spotlight looks in hypershade

Now, let's try another render

There are artifacts on the ground. Let's disable "cast shadows" on that object since those are self shadowing artifacts that we don't need anyway.

Let's add an opacity Per particle on the particle1 shape to fade those particles as they approach to the very end of their life. Select particle1, open particleShape1 tab and scroll down to Add Dynamic Attributes > Opacity > Add Per Particle Attribute.
Now, on that Opacity PP textbox right click > Create Ramp. Edit as you like, making its interolation linear, exponential up, exponential down, etc. The idea is to make it transparent before they die.
If you render again, you won't notice anything, right? Well, we have not connected that opacity to the surface shader yet! We have to connect those. Open hypershade and display input/output connections of surfaceShader2 (the one attached to the particles). To display nodes attached to the rendermanCode_color node, you have to select it as well and click on "Input and Output connections" on the hypershade as well...
Save your scene. There's a bug where maya can crash if you click on the arrows to navigate between renderman code nodes connections.
Soo, open hypershade and middle click and drag rendermanCode_color to surfaceShader2. Select "Other" from the menu to open the Connection Editor.

connect o_outParticleOpacity to outTransparencyR , outTransparencyG and outTransparencyB
close connection editor. And render.. you'll see opacity in action now.

Adjust opacity to taste.
If you noticed, there's something about the color. The sphere looks way too dark. That's because we are using a linear image. The particles look ok tho. Don't know why but should look as dark as the sphere. We can add a function to linearize the particles color (if you want, of course):

I hate I can't post code properly.. well, the above code will "linearize" the color from rgbPP. There's a lot of info @3delight forums about it..
Adjust the color on the ground object to a slightly darker blue, adjust diffuse values and cache the particles. Then, enable motion blur and render :)

You can download the final scene from here, but you have to do the light shader mel part since I'm on linux and I'm using different paths. Ain't difficult tho. Or simply attach any existing spot light shader and edit it manually.
And finally, the rendered sequence is this one:
good night and good luck.
1 comment:
THX
Post a Comment